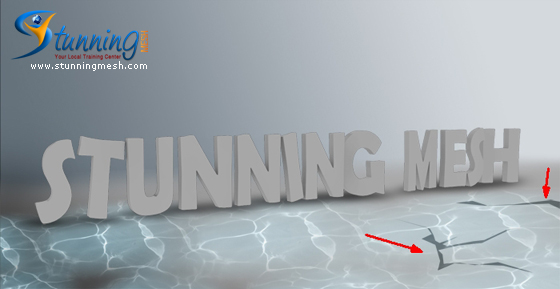
In this Photoshop Tutorial, we will be making Underwater 3D Text Effect. We will be making water effect also in this tutorial. 3D text to use and some effect will be given on it. Some blending option, filters also to use in this tutorial, so it will be very useful for those who are in Web Design Training, Web design Learning, Graphic Design Training, Graphic Design Learning, 3D Web Design etc.
1. Lets start with a new file in Adobe Photoshop, having the following properties:
2. Create a new layer and fill with Gradient tool ![]() by using #65727c and #d3d8dd (from left to right) colors as:
by using #65727c and #d3d8dd (from left to right) colors as:
3. Create another layer and create selection with Polygonal Lasso tool ![]() and Erase the top edge of the layer by using Eraser tool
and Erase the top edge of the layer by using Eraser tool ![]() and use Paint Bucket tool
and use Paint Bucket tool ![]() to fill the selection with #a8a8a8 color as:
to fill the selection with #a8a8a8 color as:
4. Now after taking new layer paint the following areas with Black color by using Brush tool ![]() :
:
5. Now I’m going to use this Water Caustic image:
6. Paste this image on your file, erase the top area by Eraser tool ![]() and change the blending option of the layer from Normal to Screen from layer panel
and change the blending option of the layer from Normal to Screen from layer panel ![]() :
:
7. Now I’m going to use the following PNG image which is having Stunningmesh in 3D:
8. Now take new layer behind this text layer, pick Brush Tool ![]() with Dark gray color, make the following shadows:
with Dark gray color, make the following shadows:
9. Now I’m going to add some cracks on the surface, take new layer, pick Polygonal Lasso tool ![]() and by using #a8a8a8 color, make the crack as shown below:
and by using #a8a8a8 color, make the crack as shown below:
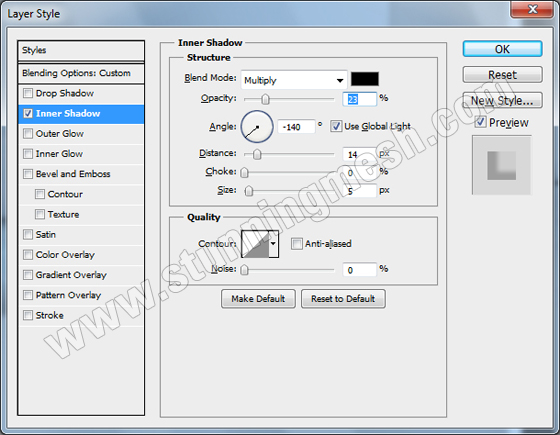
10. Goto Layer >> Layer Style >> Inner Shadow and give the following settings:
11. Now select the text layer and apply the following Layer Styles:
after hitting ok, you will get this result:
11. Create new layer above this text layer, pick Move Tool ![]() and hold Ctrl key and click on the thumbnail of previous Text layer, so it will bring marquee around the text, now pick Brush Tool
and hold Ctrl key and click on the thumbnail of previous Text layer, so it will bring marquee around the text, now pick Brush Tool ![]() and pick #adced9 color, paint the edges of the selection and then change the blending mode from Normal to Lighter Color from layer panel, you should have something like this:
and pick #adced9 color, paint the edges of the selection and then change the blending mode from Normal to Lighter Color from layer panel, you should have something like this:
12. New create another new layer, pick Brush tool ![]() and make the following white spots then change this layer mode from Normal to Screen and add the following Layer Style (with #066022 color):
and make the following white spots then change this layer mode from Normal to Screen and add the following Layer Style (with #066022 color):
So you will get something like this:
13. Now I’m going to put the following image to give Aquatic effect:
Change the mode from Normal to Overlay so you should have something like this:
14. Now click on “Create a new fill and adjustment layer” button ![]() from Layer Panel and select Levels and give the following settings:
from Layer Panel and select Levels and give the following settings:
Now add Color Balance by using the following settings:
So you should have the following final Underwater 3D Text effect in Photoshop, hopefully it will be a valuable assets while you are in Graphic Design learning or Graphic Design Training field, hope you have enjoyed this tutorial:


Thank You for this, such a wonderful information
you have to take into consideration that some of us are complete beginners with no TIME INVESTED in playing with photoshop while you claim this is an easy tut for yourself or those who spend their fri and sat night on the computer, i was stuck at step 2-3 because you simply didn’t explain it properly.
Thank you for posting it tho i’m sure the experts will praise you for it.
cheers
Thanks for sharing informative blog. This will help us a lot.
Really Nice article, Thanks for such informative article.
Nice Post! Thank you for sharing great information.
Excellent tips. I am very interesting to read.
thanks a lot sir for this information .
Hi Mirza Furqan Adil
found great information thanks!!
Thank you for sharing this awesome post with us.
I really like reading through and I think this website got some really useful stuff on it!
I’m just trying to learn how to use Photoshop.Thank you for your article.It’s very helpful.
very nice
tank you
Quite and involved process to achieve the underwater effect but a very nice result in the end. Thank you for the tutorial.
no offense, but your tutorial sucks bigtime… it’s like only half the steps are mentioned… I’m currently studying photoshop and even now still don’t get anything you’re trying to explain as it’s so badly explained…
Thank you for nice tutorial, I just made my facebook cover using this method:)
After you made a Polygonal selection you say you used an Eraser. Used on what? There is nothing but an empty selection. There is nothing to erase. I understand that you mean to fill it with color first, but people who are new to Ps will not be able to follow that kind of instructions.
so much creative tips and tricks you sharing in this beautiful tutorial.
Woe amazing 3D effect! Great work! Nice tutorial you have explained!
Can I use adobe photoshop cs2 for this project? Please reply on my post. Thank you!
Yes you can use it
Nice tutorial! thanks for this details, it would be useful, thanks!
Er klopt helemaal geen kanker van gozer
i wish you can explain this tutorial in more detail. I can’t understand some of the steps. im stuck at #3 T.T
Infact as we don’t need straight selection, that is why we used Polygonal Lasso Tool to make some angled selection. After making the selection, pick Eraser tool and erase the top part of the selection, so we will be having top edge a little big blurred. So that is why we erased top edge by using Feathered Brush so that top part of the selection should be in Feather, hope this time you got it?
Thanks a lot for your comments and compliments, I am really inspired by these…
thanks. really useful post.
Wow.. its looks really nice .. Thank you very much for such wonderful Tutorial . i love to try this one and see my name underwater ;)… As i want to also print my name in history like Titanic underwater :p