• Home
  • Articles
    • Décor
    • Development
    • Printing
    • SEO
    • Social Media
    • Tips & Tricks
    • Web/Graphic Design
    • WordPress
  • Reviews
  • Tutorials
    • 3D-Studio Max
    • Corel Draw
    • CSS
    • Dreamweaver
    • Photoshop
      • Backgrounds
      • Drawing
      • Mix
      • Pictures
      • Slice Mockups
      • Text
  • Wallpapers & Posters
  • Home
  • Contact Us
  • Contribute to Stunning Mesh
  • Privacy Policy
  • Menu
  • Skip to left header navigation
  • Skip to main content
  • Skip to secondary navigation

StunningMesh – Tutorials & Articles

Blog about IT, Design, Tutorial, SEO and a lot more.

  • Home
  • Articles
    • Décor
    • Development
    • Printing
    • SEO
    • Social Media
    • Tips & Tricks
    • Web/Graphic Design
    • WordPress
  • Reviews
  • Tutorials
    • 3D-Studio Max
    • Corel Draw
    • CSS
    • Dreamweaver
    • Photoshop
      • Backgrounds
      • Drawing
      • Mix
      • Pictures
      • Slice Mockups
      • Text
  • Wallpapers & Posters

Chrome Wallpaper – Photoshop Tutorial

Home » Tutorials » Photoshop » Mix » Chrome Wallpaper – Photoshop Tutorial

Hope you will enjoy these kind of Wallpapers, now you can make by yourself. This Tutorial will teach you how to make Chrome Wallpaper in Photoshop. Very Easy and Simple Photoshop Tutorial.

1. Create new file with following settings:

stunning-mesh-tut29-1

2. Create a new Layer. Fill with any color. Then goto Layer >> Layer Style >> Gradient Overlay. Give the following settings:

stunning-mesh-tut29-2

You will get this:

stunning-mesh-tut29-3

3. Chose line tool and draw different lines like:

stunning-mesh-tut29-4

4. Merge all lines in one layer and run the command Filter >> Blur >> Gaussian Blur and give the following settings;

stunning-mesh-tut29-5

5. Now run the command Filter >> Blur >> Motion Blur and give the following settings:

stunning-mesh-tut29-6

This effect will come:

stunning-mesh-tut29-7

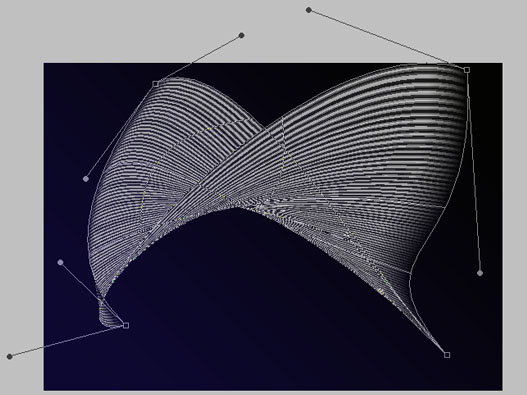
6. Run the command Edit >> Transform >> Warp

stunning-mesh-tut29-8

and while using Nodes make the shape like this:

stunning-mesh-tut29-9

7. Press Ctrl+T and change the size like this:

stunning-mesh-tut29-10

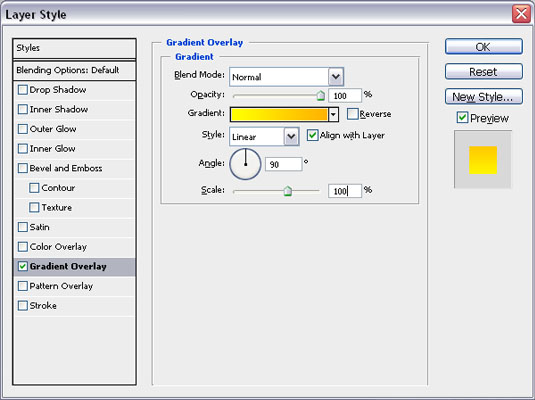
8. Run the command Layer >> Layer Style >> Gradient Overlay and give the following settings:

stunning-mesh-tut29-11

It will give the following look:

stunning-mesh-tut29-12

9. Run the command Layer >> Layer Style >> Outer Glow and give the following Settings:

stunning-mesh-tut29-13

It will give following look:

stunning-mesh-tut29-14

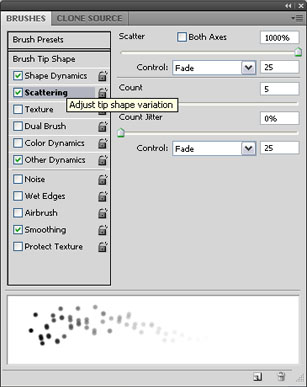
10. Create new layer and bring white color in Foreground color, then take Brush tool and press F5 key then chose the following:

stunning-mesh-tut29-15

stunning-mesh-tut29-16

stunning-mesh-tut29-17

stunning-mesh-tut29-18

and make the circles like this:

stunning-mesh-tut29-19

11. Run the command Layer >> Layer Style >> Outer Glow and give the following settings:

stunning-mesh-tut29-20

You will get this result:

stunning-mesh-tut29-21

12. Now we are going to make big circles, again take Brush tool and press F5 key then chose the following settings:

stunning-mesh-tut29-22

stunning-mesh-tut29-23

stunning-mesh-tut29-24

stunning-mesh-tut29-25

make circles like this:

stunning-mesh-tut29-26

13. Run the command Layer >> Layer Styles >> Outer Glow, and give the following settings:

stunning-mesh-tut29-27

here is the final result you will get.

stunning-mesh-tut29-28

Previous Post: « How to make Colorful Radiant Lines in Photoshop?
Next Post: Adobe Photoshop – Lecture 5 »
  • Home
  • Contact Us
  • Contribute to Stunning Mesh
  • Privacy Policy

STUNNINGMESH.COM IS A PARTICIPANT IN THE DIGITAL MARKETING ASSOCIATES PROGRAM, WHERE THEY PROVIDE ALSO SERVICES OF DIGITAL MARKETING.