Very simple technique to make Colorful Radiant lines while using Adobe Photoshop, it can be used as Wallpaper, very attractive and awesome effect, here we are going to start.
1. Take a new file with following size:
2. Take Brush tool and change its settings as follows:
3. Create new layer and then pick Pen tool , Draw the path like shown below,
then right click on it and select Make Stroke Path, don’t forget to switch on Simulate Pressure and select Brush from list and hit OK, then press Esc key twice to get rid of path.
This shape will rise.
4. Hold Ctrl key and click on the Thumbnail of this layer in layer panel, it will show selection around the shape, and run the command Edit >> Brush Preset and save the curve as brush (just write the name and hit OK). Now hide the layer by clicking on Eye in Layer panel. Pick Brush tool and press F5 Key (or run the command Window >> Brushes), chose the brush which you just saved, hit shape Dynamics on the left and Smoothing should be on. Like shown below:
Now hit the Scattering and give the following settings:
5. Create new layer and bring white color in Foreground, by using brush click on different places to make lines as shown below:
6. Now run the command Layer >> Layer Style >> Drop Shadow and give the following settings:
it will give the following look:
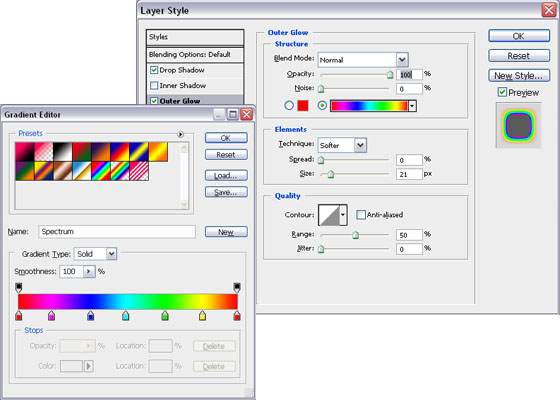
7. Now run the command Layer >> layer Style >> Outer Glow and give the following settings:
it will give the following look:
8. Now duplicate the layer and go to Layer >> Layer Styles >> Outer Glow and change the settings as:
You will see the following effect:
9. Select these two layers and press Ctrl+E to merge these, like:
10. Create new layer and pick Brush tool and select any color, draw random shapes with changing the colors and using the brush, to make shape like this.
11. Now run the command Filter >> Blur >> Gaussian Blur and set the blur to 50:
12. Change the blending mode from Normal to Color and change the opacity to 50%, you will find the final shapes of Colorful Radiant lines:


