
Remove Background
This is very very important and useful Tutorial. Many people wanted to delete the background of their picture, but they must be finding difficulty if picture is having Hair flying in the air and they don’t want to delete these Hair. So here I’m going to tell you how you can remove Background without removing the Hair.
Procedure
1. Lets start with a Picture. First If you have your own picture that you want to get rid of backgroundthe well and good, if you don’t have, then find one through NET.

2. Second Go to Channel Panel, by running the command Window >> Channel and select Blue channel.

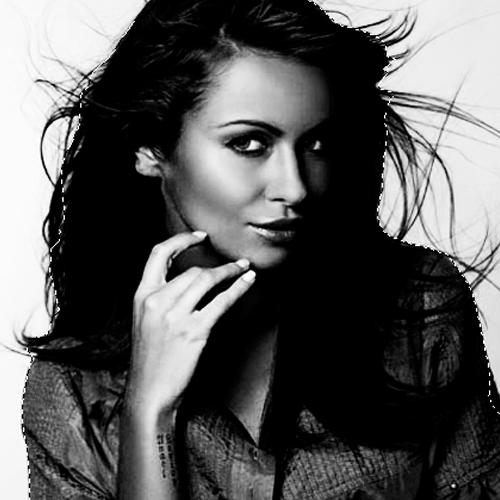
3. Create a copy of Blue channel as you see in below image (by right clicking on Blue layer and selecting Duplicate Channel), we will work in this channel now:

4. Now Bring Curves dialogue box by running the command Image >> Adjustments >> Curves or just press Ctrl+M to bring the dialogue box and give the following settings:

5. Now by using any selection tool, select the inner part of your picture, you can do this by using Pen Tool ![]()
6. Fill the selection with Black color (don’t take any new layer):

7. Pick smooth brush and change the mode of layer from Normal to Overlay. Don’t forget to select the Black color from Foreground color palette.

8. Furthermore drag your brush over hair as shown below:

9. Now pick Move tool ![]() and hold Ctrl key and click on the thumbnail of Blue copy Layer, it will bring Marquee around the picture.
and hold Ctrl key and click on the thumbnail of Blue copy Layer, it will bring Marquee around the picture.

10. Now click on the RGb in Channel Panel:

Come back to Layer Panel. Hit Delete key and then press Ctrl+Shift+I to inverse the selection, press Ctrl+C to copy it then Ctrl+V to paste it:

See the bottom result:

12. Now delete your original layer:

13. Take new layer behind this picture and apply any gradient or color or any picture behind this picture:

finally here I’ve pasted original and after changing the background and see the hair, these are visible without any change:

Subscribe Stunning Mesh For More Informative Topics


Thanks for such a detailed article on how to remove background without removing hairs. This is something I was looking for ages now. But now I understand the whole procedure of doing it with ease and precision. Thank you once again.
I loved your blog. If anyone looking for some background removal services for bulk photos then just contact us .
Thanks for your tutorial. Can you please share with me which one the best software for a new graphic designer.
Nice Tutorials. Thanks for Sharing.
in last 2 step from whr to copy n whr to paste?
tell ur email id I will help you
thank you! very helpful!
where to copy n whr to paste in 2nd last step
Hi,
thanks for this tutorial.
Can u please tell me why you did step 4 & step 8.
Regards,
Nupur
I step 4 you are going to make Curves prominent (a kind of darkness etc.) and in Step 8 you have to brush on the edges.
At the part where I go Ctrl+Click with selection, it does not marquee like yours. Instead it just selects things from all over the image. When I do the part at the end where it says delete, inverse, copy and paste, it won’t paste a new layer. What’s up? Can you make a video for this and post it?
You must be clicking on Ctrl+Click on your layer name, which is not right thing. You have to click on the Thumb of Layer (towards left of Layer Name in Layer Panel, it will be a small Square) then it will bring Marquee around it. Let me know if you find difficulty please?
KHONG HE
I’m sorry to tell you – but your tutorial is very unclear. It also lacks some explanations and more vivid examples.
For example, you never say what to do with the ‘Blue copy’ layer, plus, when I use my brush with the overlay option it just paint like regular brush… I’m not new to Photoshop but following your tutorial I failed.
Thanks for pointing out 1 mistake. Infact one wrong file was uploaded (that is in which Blue mentioned instead of Blue Copy) and it is now corrected. I’ve also made it more easy by putting images of Tools which I’ve used. So hopefully now it will be more clear to you.
Amazing,thanks for this tutorial,i was lloking for a tutorial like this, it will help a lot