
Though it is very long tutorial, but not boring I’m sure. By using this tutorial, you can make your Picture, under water room looking. You will need your picture and some more pictures to give the reality, as I’ll be using in this tutorial.
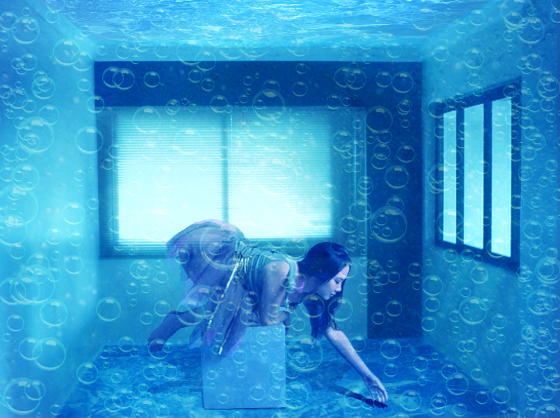
Final look of our Under Water Room Tutorial in Adobe Photoshop:
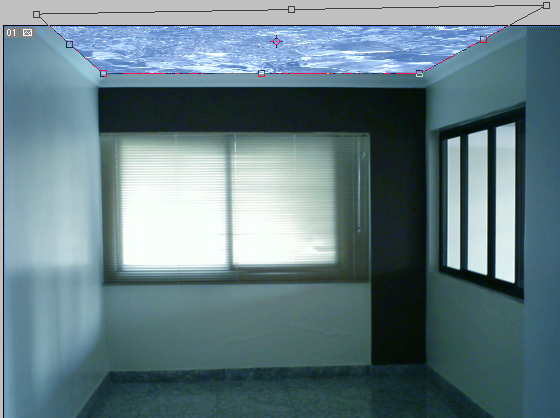
1. Lets start with a picture, you need to show it as Under Water. I’m using an Empty Room picture, I got it through NET.

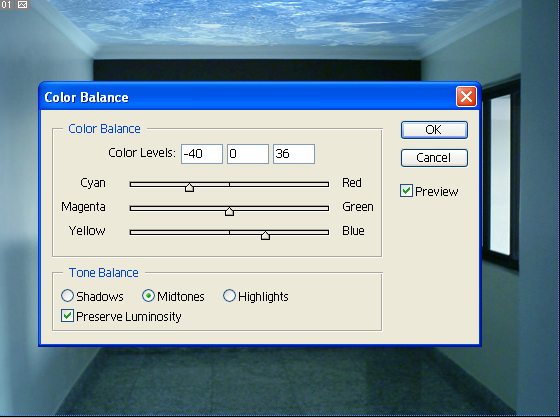
2. Run the command, Image >> Adjustments >> Color Balance or simple press CTRL+B and give these settings:

3. Now you will need any wall paper having Water look, I got one through NET, open it and paste it on your Picture

4. Press CRTL+T and right click on it and select Distort, now pick corners of the picture and adjust it over the ceiling like shown below:
5. Now use Burn Tool ![]() and brush over the picture:
and brush over the picture:

6. Pick Eraser tool ![]() with soft edges, and brush over the edges of this water picture:
with soft edges, and brush over the edges of this water picture:

This kind of look will come:

7. Press Ctrl+B (Color Balance) again and give the seetings:
8. Create new layer and fill it with#3bd2ed color and change the blending mode from Normal to Soft Light through Layer Panel and change the opacity to 30%:

9. Now I’m going to create some Dark areas, pick Rectangle Tool ![]() and draw a rectangle having #4a7675 color and reduce the opacity of this layer to 40%:
and draw a rectangle having #4a7675 color and reduce the opacity of this layer to 40%:

10. Run the command, Filter >> Blur >> Gaussian blur and give 10px as Radius:

11. Its time to create Floor now, again paste your Water picture:

12. Press CTRL+T and right click on it, then select Distort and by using the corner nodes, adjust this over Floor, as shown below:

13. Press Ctrl+B (Color Balance) and give these settings:

14. Again by using Eraser Tool ![]() , erase the edges like:
, erase the edges like:

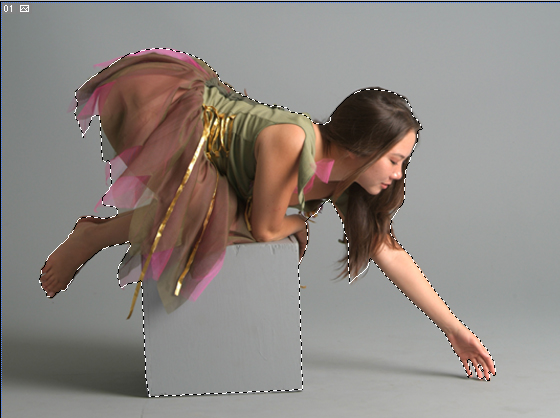
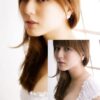
15. Now I’m going to give some reality by putting a Lady picture. I got one of my desire photo through NET, open it:

16. By using Pen Tool ![]() , select the lady along with Stool:
, select the lady along with Stool:
17. Press Ctrl+C to copy it, close this file and come back to your file again and press Ctrl+V to paste it:

18. Press Ctrl+J to copy it and by locking the Transparent Pixel icon on Layer Panel ![]() , fill it with black color and then press Ctrl+T and reduce the height to give it as Shadow look like shown below:
, fill it with black color and then press Ctrl+T and reduce the height to give it as Shadow look like shown below:

19. Again press Ctrl+B (color balance) and apply these settings:

20. Select the Lady Picture and press Ctrl+B (Color Balance) and give the settings:

21. Again press Ctrl+B (Color balance) and give the settings:

This kind of result should come:

22. By using Burn Tool ![]() , brush it over the face and hands:
, brush it over the face and hands:

23. Now I’m going to add some Bubbles, you need any Bubbles wallpaper, I got one through NET so using it:

24. Put it over your current file and erase the Ceiling part:
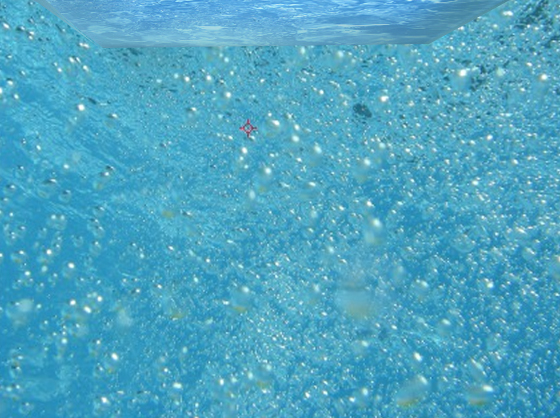
25. Change the blending mode of this layer from Normal to Soft Light and reduce the opacity to 60% and give this color balance (by pressing Ctrl+B):

26. Now I’m going to use another Bubble picture, but this time more visible bubbles, I also got it through NET.

27. Paste it over your Picture and change the blending mode from Normal to Overlay and reduce the opacity to 40%:

28. Image >> Adjustments >> Brightness & Contrast and give these settings:

This kind of result should come:

29: Now create a Group (Set) and put all your layers inside it ![]() , right click on the Group name and select Duplicate Group, press Ctrl+E to merge all layers in it, goto Filter >> Blur >> Radial Blur and apply these setting:
, right click on the Group name and select Duplicate Group, press Ctrl+E to merge all layers in it, goto Filter >> Blur >> Radial Blur and apply these setting:
Amount:50px
Blur Method:Spin
Quality:Best
now change the blending mode from Normal to Overlay through Layer panel and reduce the opacity to 50%:
Here is the final look of our Under Water Room Tutorial in Adobe Photoshop:

The floor and the bubbles look terrible
Nice tutorial – thanks. I think the bubbles may be a bit over the top – I really like the ceiling and floor stuff though!
Yes, i agree with Eren. I feel the lady image does not match up to this effect.
Pretty cool idea,
bu it feels rather we’re seeing the room through an aquarium.
nice work though. thanks.
beautiful effects you using in this tutorial.