Here is a beautiful and amazing 3D Pixel Text Effect. I made it in Adobe Illustrator. A lot of commands for you to learn while making this. Hopefully you will like it.
1. Lets start with a new Document of any size. Then type your desire text over it. I’ve typed Stunning Mesh with pink color. You will need a pixel font, if you have installed in your PC then use it, otherwise you can download it through NET. So install it and use it, like I’ve done:

2. Now select your text and run the command Effect >> 3D >> Extrude and Bevel, apply these setting to your text:
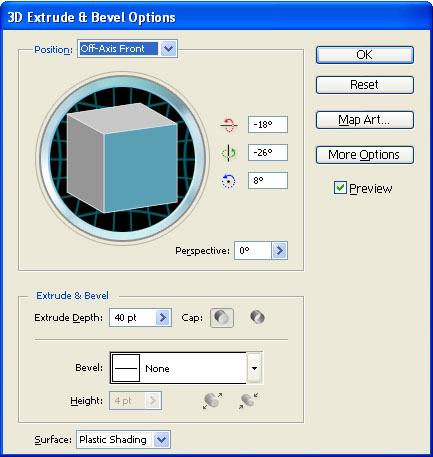
3. Here is the 3d text effect look. This is the simple way to make your text 3D, but now I’m going to do some work on it to make it attractive:

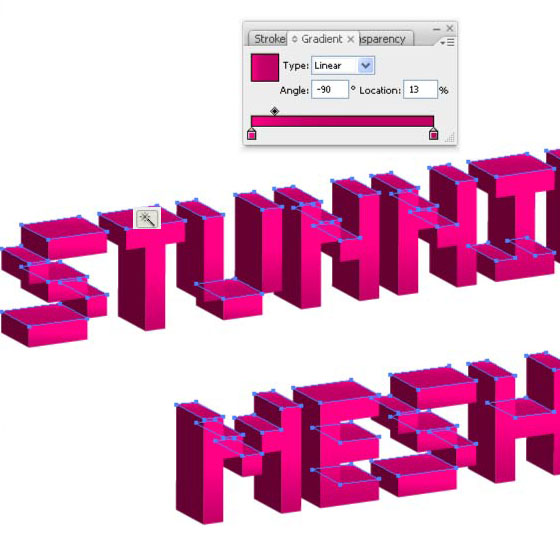
4. Now I’m going to give gradient over it, for this purpose I’ll convert this text into Outline. Just go to Type >> Create out line. Now we can give Gradient over it:

5. Pick Magic Want Tool ![]() and select the Front text. Pick Gradient tool and press Ctrl+F9 to open its panel (or Window >> Gradient). Make the following gradient, #fa0080 light pink to #b30566 dark pink.
and select the Front text. Pick Gradient tool and press Ctrl+F9 to open its panel (or Window >> Gradient). Make the following gradient, #fa0080 light pink to #b30566 dark pink.

6. Again use Magic Wand tool select the Depth area, which is created by running 3D Extrude command and give the gradient as shown in the following figure: #e90580 light pink to #bc045a dark pink
7.This kind of result should come:

8. Now I’m going to make the Background. Just create a Rectangle of any size by using Rectangle Tool ![]() and give it the Gradient as shown below: (#81cff3 light blue to #2796f0 dark blue)
and give it the Gradient as shown below: (#81cff3 light blue to #2796f0 dark blue)

9. Place this rectangle behind the text by hitting Ctrl+[ key. Now pick Ellipse tool ![]() and draw ellipses and circles in white color as shown below:
and draw ellipses and circles in white color as shown below:

10. Select all these clouds and place behind text, but in front of Rectangle.

11. Now I’m going to make the Shadows of each letter. Pick Ellipse tool and draw small black ellipse at the bottom of S (the first letter).

12. Select this ellipse and go to Effect >> Blur >> Gaussian Blur and give 4px radius and the opacity to 50%:

13. Now repeat these steps to make shadows of all letters, like:

14. Now you can also give some Detailing by adding some stars, like I’ve done in the final image below:


We are LogoProDesign as a Creative Logo Designer, We checked your artwork collections. Those are amazed us. Thanks for that type of good work collections. We regularly checked your website for good artwork example.
Thanks
David Thomas
Thanks for your appreciation…