
Here is another stunning effect, you can make abstract background by using this effect in Adobe Photoshop. Not a long tutorial and not a boring also, so hopefully you will also make this.
1. Lets start with an empty new file of any size, I’ve taken 560×400 size. Fill it with Black color.
2. Create new Layer and pick Brush tool ![]() with Soft edges with Large Size and with White color in foreground (by pressing D and then X). Click on the center of the document to make a Spot like:
with Soft edges with Large Size and with White color in foreground (by pressing D and then X). Click on the center of the document to make a Spot like:

3. Press Ctrl+T (Transform) and then reduce the height as shown below:

4. Now press Ctrl+J to duplicate it and then reduce the size and position as shown below:

5. Repeat this step two times and then move the spot like shown below:

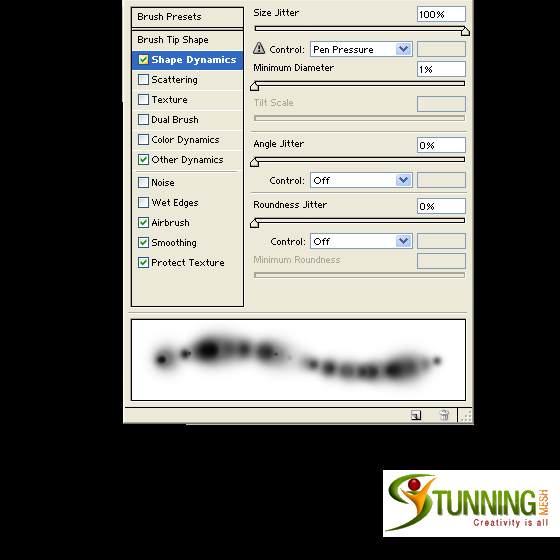
6. Now we are going to create our own brush, press F5 key and give the following settings:

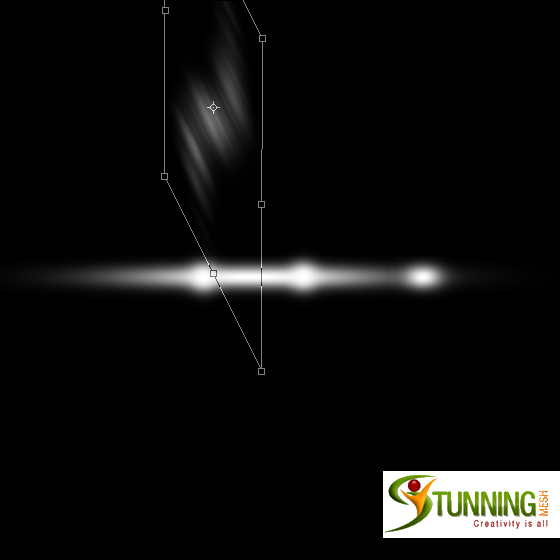
7. Create new layer and pick Pen tool ![]() and draw the shape as shown below: (Don’t convert it into Selection)
and draw the shape as shown below: (Don’t convert it into Selection)

8. Press A (Path Selection Tool ![]() ) and right click anywhere and select Stroke Path:
) and right click anywhere and select Stroke Path:

9. From the box select Brush, check Simulate Pressure and then Press ok (then right click on it again and select Delete Path):

10. Now go to Filter >> Blur >> Motion Blur and apply these setting:

This kind of effect should come:

11. Pick Move tool ![]() and then press Ctrl+T (Transform) and right click on it and select Skew and by using left or right node make the shape like shown below and press Enter key:
and then press Ctrl+T (Transform) and right click on it and select Skew and by using left or right node make the shape like shown below and press Enter key:
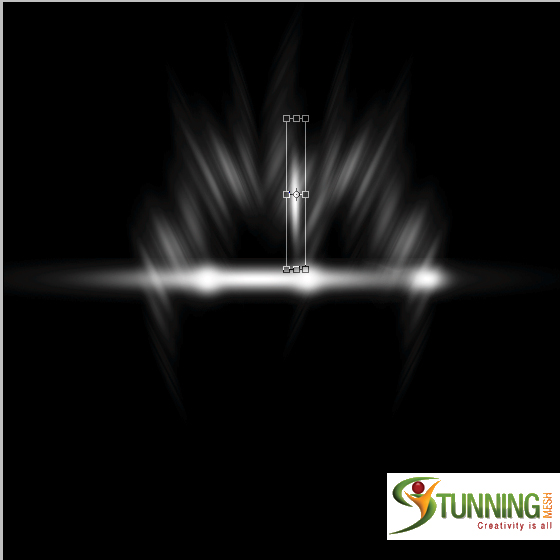
12. Now change its angle and then duplicate is few more times and adjust these like shown below:

13. I’m now going to duplicate the Bottom shape and then reducing the height and size and changing the angle and position, like shown below:
14. So I’ve make something like this:

15. Select all layers and press Ctrl+E to merge all layers. Now press Ctrl+M (or goto Image >> Adjustment >> Curves) and make the line as:

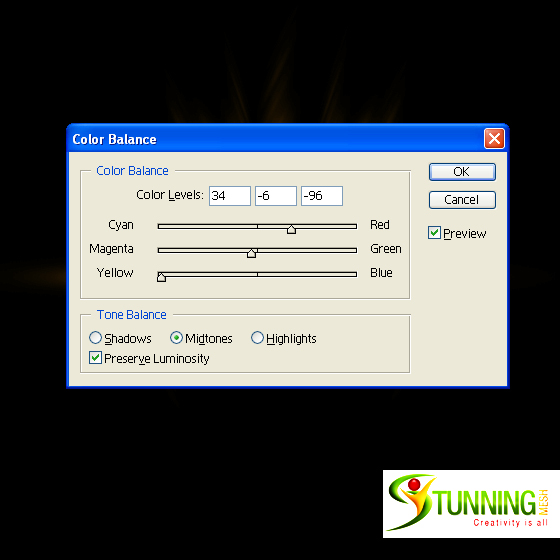
16. Now press Ctrl+B (or goto Image >> Adjustment >> Color Balance) and give these settings:
17. Again press Ctrl+B (Color Balance) and this time give the following settings:

18. Again press Ctrl+B (Color Balance) and change the settings as shown below:

This kind of Background you will have:

19. Now go to Filter >> Sharpen >> Sharpen. Repeat this step three more time by pressing Ctrl+F three time,
You’ll get the Final Result of our Abstract Background in Adobe Photoshop:


great!
Hi there,
Many thanks for that, I found it very interesting. I hope to read more soon.
Swansea Property Agents.
Hello, Hi, Hey, great article, post, blog, I, we love, like, loved, liked it !!!
I think it is undoubtedly so!
Nice post.
Well done!
Attention website owner.
I happened to find my way to your blog today – I like it!
If you’re like me you probably want more traffic to it?
Now this is a bit of a shameless recommendation but I thought I’d let you in on a piece of software that has helped me get first page rankings on Google. 🙂
It’s called Brute Force SEO and you can access a 7 day trial here totally free. Test it for 7 days it will cost you nothing.
nice post there.. that should be usefull. thanks a lot for the post. regards from cicakstudio
Great article!
Keep it up
Nice article!
Thanks
Perfect blog!
Keep it up
Nice blog!
Will revisit
kaliteli güzel escort bayanlar
Nice blog. Keep it up. Cheers
Nice blog. Will visit again. See you
Good blog. Keep it up. See you
Awesome point of view. Will come again. See you
Good point of view. Well Done
Good point of view. Nice job
Good article. Keep writing
Good job. Keep it up
Nice job. Keep it up
Howdy, just stopping by to show some [holiday|seasonal|Christmas|Kwanza|winter} cheer! I respectfully appreciate how hard it is blogging all this information! Have a GREAT NEW YEAR!
Thanks!
Very good discussion. Keep writing
Nice point of view. Keep it up.
Nice thought. Keep it up.
Good thought. Keep it up.
Vpills Ana Bayi Penis uzatıcı hap satışı
Such a good view. Her should receive credit for it. Thanks
Such a nice article. He should receive credit for it. Thanks
Hey There I am having a problem seeing your whole page on my ipad machine.
Just wanted you to know.
Thanks