You must have seen this kind of effect in Raster based software, but very rare in Vector based software. So here I’m going to tell you how to make Wooden Effect in Illustrator. Very short tutorial and obviously an Important one. You may learn some Basic Illustrator Tools while working over this Tutorial. So for beginner it is an important Tutorial so that they can polish their skills. Enjoy exploring this and other awesome Illustrator Tutorials on our Blog.
1. Lets start with a new file. Pick Rectangle tool and draw any rectangle, height should be 1 px. Then copy this rectangle so many times to make the following:
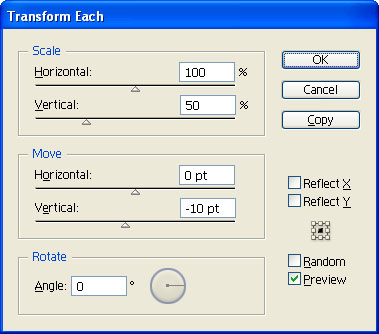
2. Now go to Object >> Transform >> Transform Each and apply these setting:
This kind of effect would come:
3. Now pick Warp tool and double click on the tool, Warp Tool Option box will appear, give the following settings:
4. Now use your mouse pointer on different places over the lines and drag them randomly.
5. Now pick Twirl Tool (click and hold on Warp Tool). Then double click on Twirl tool to show Options box and give the following settings:
6. Use the twirl tool like this:
7. Now pick Pucker Tool (click and hold on Twirl Tool). Then double click on the tool to display Pucker Tool Options and give the following settings:
8. Use the brush to make the shape like this:
9. Now pick Rectangle tool again and draw a rectangle behind these lines and fill it with # D8994E color:
10. Now select all lines and fill with #D8994D color and outline to none, so here is the Final Result of our Wooden Effect in Illustrator, hope you enjoyed it a lot, keep visiting our blog for more awesome and important tutorials about Photoshop, 3D Studio Max, CorelDraw and other Design Tools:


