
Here is a nice technique to make 3D Disco Ball or Disco Lights in Illustrator. Some new commands and technique for you to work out. Beginner will really love to work on this simple and awesome Tutorial. So enjoy!!!
1. Lets start with a new file. Create Rectangle by using Rectangular Tool ![]() . Fill it with Gradient of your own choice, I’ve filled Radial with the following colors:
. Fill it with Gradient of your own choice, I’ve filled Radial with the following colors:

2. Select this rectangle and go to Object >> Rasterize and press ok.

3. Now go to Filter >> Create >> Object Mosaic and use these settings:

4. This kind of effect should come:

5. Now open Symbol panel but running the command Window >> Symbols (or press Ctrl+Shift+F11). Now hold your rectangle and drag it into the Symbol panel. When you will release the mouse a box will appear. Just hit Ok, no need to change anything:

6. Pick Ellipse tool ![]() and draw a Circle. Now pick Direct Selection tool
and draw a Circle. Now pick Direct Selection tool ![]() and select only left node (by dragging mouse pointer over left node), I’ve pointed in the bottom image. Just hit Delete key and you will get Half circle:
and select only left node (by dragging mouse pointer over left node), I’ve pointed in the bottom image. Just hit Delete key and you will get Half circle:

7. Now go to Effect >> 3D >> Revolve and apply these settings:

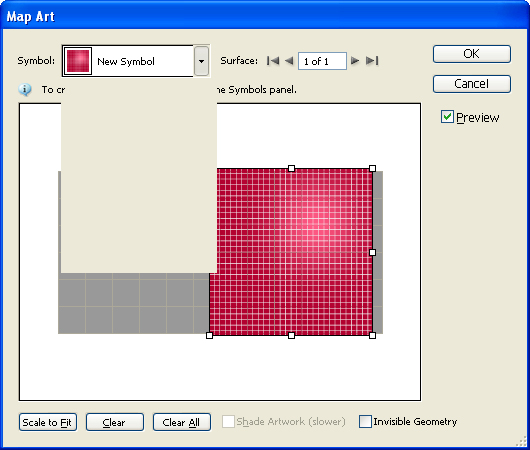
8. In the box hit Map Art button, and apply these settings: (from Symbol select your last created symbol and when symbol came, adjust it over your rectangle like shown below)
9. After hitting Ok, you will get this:

10. Now go to Object >> Expand Appearance. Select your circle and press Ctrl+Shift+G three times then select the Dark lines as shown below:

separate these from mosaic and delete the useless ellipse:

Hit delete key and you will get this:

11. Now create another Circle of same size and apply same gradient on it. Put it beside the Grid circle and align it center and middle of it: (The bottom 3rd circle)

12. Release Clipping Mask and un-group tiles (by pressing Ctrl+Shift+G). Now select some small pieces and change their colors by using Edit >> Edit Colors >> Recolor Artwork and apply these setting:

13. You will get some thing like this:

14. Now select some more parts and this time change the color as follows:

This kind of effect should come:

15. So I’ve selected some more parts and changed the colors:

16. Now I’m going to give it some Sparkling effect. Select Star tool ![]() , and click anywhere on the Document a box will appear, give the following settings:
, and click anywhere on the Document a box will appear, give the following settings:

After hitting ok you will get this:

17. Fill the star with white color and duplicate this star and paste on different places to give Sparkling Effect.

Here is the final look of our Disco Lights in Illustrator, hope you’ve learnt a lot from this Simple Tutorial:


how would you find the preserve spot colors in rasturisze option in illustrtor cs2
on step 9 the im not getting required result, the 3d circle is appearing transparent plz help!
! wonderful and so nice.
I’m having trouble selecting the black background on step 10. How or what it is the proper way to select it?
After step 9, you have to select the globe, then run Object >> Expand Appearance command, press Ctrl+Shift+G 3 times, it will separate each object and then move the upper part towards any direction and then select the lower part (background) and hit delete key. Hope it will work?
The filter took me about 5 minutes to find!!
Click “Object” on the top left corner.
Then click on the one that says “Create object mosaic”.
your welcome if i helped!!!
Thanks Chris, no doubt we appreciate.
Que CULO!
all is good, but where can I find filter in illustrator cs 5,i waste half a hour to find out where is it ,and guess what, i find nothing…..lol