
Today we are going to make Realistic Dice in Illustrator so you’ll get Vectorial Dice in Illustrator. You have many things to learn in this tutorial, some commands, some techniques and Tools of course. Especially I’ve explained 3D Bevel and Extrude in detail, hopefully you will learn a lot from this tutorial.
Final Result of Realistic Dice in Illustrator:

1. Start with a new document.
2. Pick Rounded Rectangle Tool ![]() and click anywhere on the document, Rounded Rectangle box will appear. Give the following settings. After hitting Ok you will get a Rounded Rectangle. Then give it any gradient of your own choice. I’ve mentioned these in Steps below:
and click anywhere on the document, Rounded Rectangle box will appear. Give the following settings. After hitting Ok you will get a Rounded Rectangle. Then give it any gradient of your own choice. I’ve mentioned these in Steps below:

This kind of Rounded Rectangle would come:

3. Now pick Ellipse tool ![]() and draw a Circle over it. Then duplicate this circle and enlarge its size and put this circle behind the original one by pressing Ctrl+[ key.
and draw a Circle over it. Then duplicate this circle and enlarge its size and put this circle behind the original one by pressing Ctrl+[ key.

4. Select this circle and give it the gradient of your own choice, I’ve given this:

5. Duplicate this Rounded Rectangle and then duplicate Circles to make other other sides of Dice:

6. Now select First Rounded Rectangle (that rectangle on which 1 circle is present), we are going to make it as symbol. Open Symbol box by running the command, Window >> Symbols (or simply press Ctrl+Shift+F11 key). Hold your Rounded rectangle with Circle and drop it on Symbol Panel. A box will appear, give it any name, select Graphic in type and hit ok.

7. Repeat these steps for other two sides of Dice (one having 5 circles and other having 4 circles):

8. So we have created Symbols. Now you can Delete these three rounded rectangles. Simply draw a rectangle (by using Rectangle tool ![]() ) and give it any lighter color, as my dice was having Dark green, so I’ve used lighter green here, but remember it should not be having outline:
) and give it any lighter color, as my dice was having Dark green, so I’ve used lighter green here, but remember it should not be having outline:

9. Now go to Effect >> 3D >> Extrude & Bevel and give these setting:

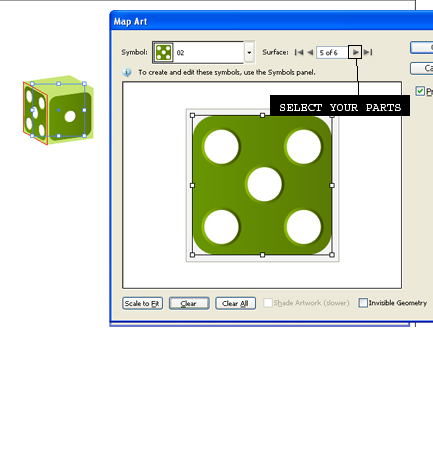
Don’t hit OK, in this box you will find Map Art, click on it. Here is the most important part. First hit Preview option, then from Symbol list box select your first side of Dice. Adjust the side of Dice within the box like show below:

10. Now from the Surface box hit Right arrow to bring your other side of the dice, suppose you want to put 5 number dice towards the left side, so hit Right arrow until you will get Red outline towards the left side, then select your Dice 02 from Symbol and then adjust it into the rectangle. Now we need to put third part of dice on upper position. Again use Right Arrow key from Surface and when Red outline came on top of the dice, then select your 3rd part of dice (having 4 circles) and then adjust it within the rectangle, hit ok then again hit ok:
You will get this effect:

11. Now pick Pen tool ![]() and draw the following shape over the first side of Dice and fill it with white color:
and draw the following shape over the first side of Dice and fill it with white color:

12. Change the opacity to 20% and also create these kind of areas over the other two sides, like shown below:

13. Now we are going to give some Sparkling stars. Pick Star tool and click anywhere on document, a box will appear, give the following settings an hit Ok. A star will come, duplicate it and change the angle and size like shown below:

14. Give it white color and place it on the corner of the dice:

15. Duplicate your star and place it on other location and change the size like shown below:

Now you can duplicate whole dice and ten change the angle to give the final following look of Realistic Dice in Illustrator:


guys i love someone but he don,t understand me without him i,m so crying but he don,t realize my felling please help me what i do piz……….
guys pyar sirf kismat walo ko he milta hai or sb ke kismat un ka sath ni dete
Hi when i give rectangle box with light green or blue color after map art that dice color change into grey color except the gradient symbol what should i do to bring it back to the light color which i applied to rectangle before 3d extrude in effects after the finishing of all the process.
Great tutorial and very well executed. Its really helpful.
Thanks for the post.
you did beautiful work in this tutorial.