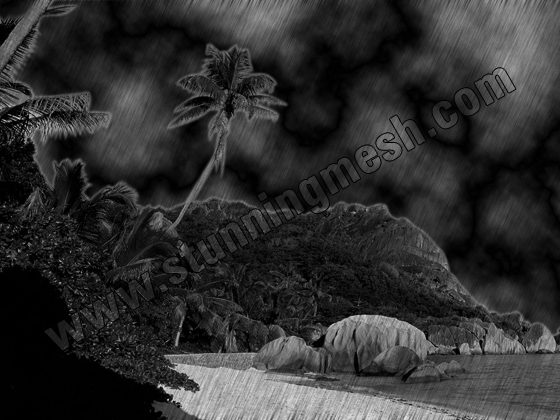
This is a tutorial in Photoshop in which you can change Natural Beauty to Beast. Like a Natural Scene converted in to Horror or Darkness rainy scene. Not a very long tutorial, but interesting one. Some commands/filters to learn in this tutorial like Difference Clouds, Add Noise, Motion Blur, Levels etc.
Final Result of Beauty to Beast Through Photoshop Tutorial:
1. Lets start with a new file and put any Natural Scenery in it. I’m going to use the following image:
2. Goto Image >> Adjustment >> Desaturation or simple press Shift+Ctrl+U key (File will convert into Black & White):
3. Now run the command Image >> Adjustment >> Levels or simply press Ctrl+L and give the following settings:
Picture will look like:
4. Now pick Pen Tool and select the sky part of this picture:
5. Right click anywhere and select Make Selection and give 1 in Feather and hit Ok. Now hit Delete key to delete the sky:
6. Take a new layer behind this picture. Now press D to bring default black and white colors in Color Palette, now hold Alt key (don’t leave it), press left click on Filter menu but do not leave the mouse pointer, take pointer on Render and then leave the mouse pointer on Difference Clouds:
you will get Contrasted Clouds behind the scenery, press Ctrl+F to repeat this command unless you get some dark clouds behind the scenery as:
7. Now take a new file of same size as we are working in the file. Take new layer, fill it with white color and run the command Filter >> Noise >> Add Noise and give the following settings:
8. Now run the command Filter >> Blur >> Motion Blur and give the following settings:
You will get something like this:
9. Now take this layer to the file where we were working and put it on the top of every layer and from Layer Panel, select Multiply instead of Normal in blending mode, you will get something like this:
10. Now take new layer and (while keep selecting Black & White in color palette) run the command, Filter >> Render >> Clouds. Now run the command Layer >> Layer Style >> Blending Options, a box will come and you will see This Layer and Underlying Layer two option at the bottom of the box. Hold the right small triangle of the THIS LAYER by holding Alt key and move it towards Right side:
you will get something like this:
11. Pick Eraser tool with large feathered Brush and erase the extra part of these clouds and reduce the opacity of layer as needed:
12. Now take Lightening picture from anywhere from the NET and put it behind the Scenery layer, convert Blending Mode from Normal to Lighten, press Ctrl+Shift+U to DeSaturate it and reduce the opacity to give this effect:
13. So here is the final result of Beauty to Beast Photoshop Tutorial and the difference between the original and what we made:


Wonderful Article. Thanks For Share.
what a tutorial. Nice to see. I think very easy to learn from here. Thanks for sharing such a wonderful creative tutorial.
Looks very amateur….
OWO!! Very nice and easy to learn step-by-step tutorial. Thanks for sharing…… 🙂
Hi! You have lot`s of great tutorials!
Congratulations!
I`we just started a tutorial indexing website and I would like to ask you to submit some tutorials 😀
You can submit tutorials without registering, but if you register you will get gift
points for each tutorial and you can use these points to buy ads.
Thanks