
In this Photoshop tutorial we will learn how to make Aqua Navigation Bar in Photoshop. This tutorial will be very much helpful to you if you are working on any Website project and wanted to make an Interface in Photoshop. Very nice tutorial, that will teach you some basic techniques. Hopefully you will enjoy working on this tutorial.

Step 1:
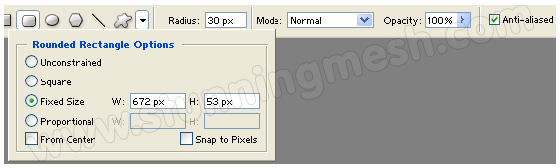
Start out by creating a new file. I used a 1000×400 px canvas set at 72dpi with a white background. Now select the Rounded Rectangle Tool and set the radius setting to 30 px on the Options bar. In a new layer, draw a long rounded rectangle with #499ED8 color shade and 672 x 53 px dimensions.
Result:

Step 2:
Under Layer Style (Layer > Layer Style) add an Inner Shadow, Inner Glow, and Gradient Overlay blending options to the long rounded rectangle layer.

Result:

Step 3:
In a new layer, draw a thin black rounded rectangle with 645 x 7 px dimensions.

Step 4:
Under Layer Style (Layer > Layer Style) add an Inner Shadow, and Gradient Overlay blending options to the long black rounded rectangle layer. Then set the layer’s blending mode to Lighten.

Result:

Step 5:
Duplicate the thin rounded rectangle layer twice and place them as shown below.

Step 6:
In separate layers, draw two black thin rounded rectangle and place them as shown below. Then set the layer’s blending mode to Soft Light.

Step 7:
In a new layer, draw light blue rounded rectangle with #34B1FF color shade and 127 x 50 px dimensions. Then cut the bottom half of the rounded rectangle.

Step 8:
Under Layer Style (Layer > Layer Style) add an Inner Shadow, Inner Glow, and Gradient Overlay blending options to the cut out rounded rectangle layer.

Result:

Step 9:
Select the Horizontal Type Tool, then set the font family to Arial, bold, 14 pt, smooth, and #36607C color shade. In a new text layer, type one of your navigation link on the button design.

Step 10:
Now add the rest of your navigation links with its own button design.

Step 11:
On the large rounded rectangle design, add your sub links using smaller font.

Final Results:
So here is our Final Aqua Navigation Bar made in Photoshop, hope you have enjoyed working on this tutorial.

beautiful and useful tutorial.