Today we bring another nice Photoshop Tutorial for you, in this Photoshop Tutorial you will learn how to design Shotgun Shell Design in Photoshop. The purpose of this awesome tutorial is to teach you some important basic commands of Photoshop like Layer Properties (like Inner Shadow, Drop Shadow, Satin, Gradient Overlay, Inner Glow etc.) and also to use how to work on Photoshop using its basic Tools like Rounded Rectangle Tool, Ellipse Tool, Rectangle Marque Tool etc. So lets start our Shotgun Shell Design in Photoshop.
As usual lets have the Final look of our Photoshop Tutorial, ShotGun Shell Design in Photoshop:
Step 1: New File
Start out by creating a new file. Use the following settings; Dimensions: 900×700 px, Resolution: 72dpi, Color Mode RGB color. Then, fill your background canvas to #00071E color using the Paint Bucket Tool .
Step 2:
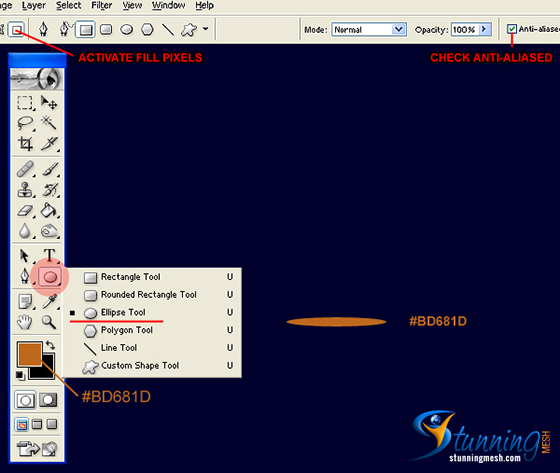
Create a new layer set and name it Shotgun Shell. Now, select the Ellipse Tool from the Tools Window on the Options Window, activate Fill Pixels and check Anti-Aliased. Create a new layer, and draw a light brown ellipse with #BD681D and 353 x 35 px dimensions. Use the Fixed Size setting under Ellipse Options.
Step 3:
Add a Satin and Gradient Overlay styles to the light brown ellipse layer. Use the settings provided on the step image below.
Layer Styles Preview:
Step 4:
In a new layer, draw a light brown rectangle with #BD681D color shade and 105 x 70 px dimensions.
Step 5:
Add a Drop Shadow, Inner Shadow, Inner Glow, Satin, and Gradient Overlay styles to the light brown rectangle layer.
Layer Styles Preview:
Step 6:
Select the Rounded Rectangle Tool . In the Options Window, activate Fill Pixels, set the radius to 30 px and check Anti-Aliased. In a new layer layer, draw a red vertical rounded rectangle with #FF0808 color shade and 105 x 400 px dimensions. Cut the bottom corners of the vertical rounded rectangle.
Step 7:
Add an Inner Glow, Satin, and Gradient Overlay styles to the red vertical rounded rectangle layer.
Layer Style Preview:
Step 8:
Now cut the top corners of the vertical rounded rectangle.
Step 9:
Create a new layer. Then, draw a red Ellipse with #F60404 color shade and 104 x 12 px dimensions.
Step 10:
Add a Gradient Overlay style to the red ellipse layer.
Layer Style Preview:
Final Image:
So I’ve also put some text over it to give a reality effect. Hope you enjoyed our today’s tutorial and will be sending our work through email.
Here is another Photoshop tutorial for you, in this Tutorial you will make M&M Chocolate Design in Photoshop, don’t forget to visit.

![Shotgun Shell Design in Photoshop – [Photoshop Tutorial]](https://www.stunningmesh.com/wp-content/uploads/Shotgun-Shell-in-Photoshop-Result.jpg)


![Orange Header Design in Photoshop – [Photoshop Tutorial]](https://www.stunningmesh.com/wp-content/uploads/Orange-Header-Design-in-Photoshop-Result-100x100.jpg)
![M&M Chocolate Design in Photoshop – [Photoshop Tutorial]](https://www.stunningmesh.com/wp-content/uploads/MM-Chocolate-Design-in-Photoshop-Result-100x100.jpg)