It is a nice technique to make Titles having fascinating look. This Photoshop Tutorial will teach you how to make Sparkling Text Effect in Photoshop. Here is one of those:
1. Take a new file of your desire size, I’m taking 560px x 400px with 72 Resolution and RGB color mode.
2. Now we are going to make Gradient background. For this purpose double click on Background layer an rename it. Now run the command Layer >> Layer Style >> Gradient Overlay. Chose these two colors, #464646 and #000000. You will get this:
3. Create new layer and fill it with the following Gradient (opacity of this layer must be 25% and instead of Normal in Layer style please select Color), must use Gradient Tool to do so with Linear type, don’t apply Layer Style command here.:
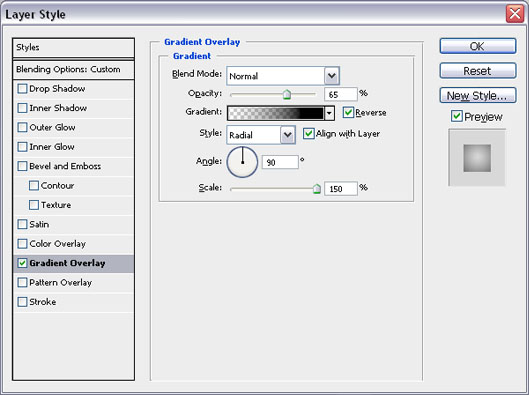
4. Now run the command Layer >> Layer Style >> Gradient Overlay and make the gradient like this:
you will get this:
5. Now pick Horizontal Type tool and write any character, I’m writing S and M (i.e. StunningMesh).
6. Go to Layer panel and write 0% in Fill box, like:
7. Now run the command Layer >> Layer Style >> Outer Glow and give the following setting:
you will get this result on S:
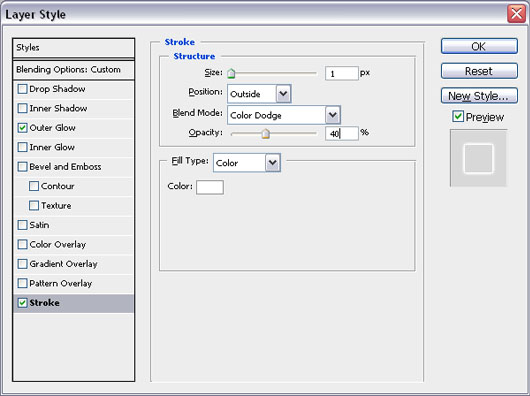
8. Now run the command Layer >> layer Style >> Stroke and give the following settings:
Here is the result:
9. Press Ctrl+J and chose any other font, like:
10. Now select original S layer and rotate it a little bit like:
11. Now again select original S layer and press Ctrl+J to copy it then rotate it (by Byard at dresshead fashion). So copy as many layers as you can, but don’t forget to change the angle or position of every layer. Like:
12. I’ve repeated all these steps for M and get the following final result of Sparkling Text Effect:


