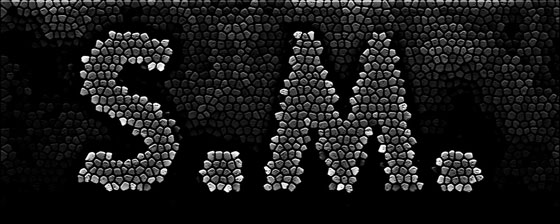
I tried to make a unique tutorial this time. I am going to make the Stone Text Effect using Adobe Photoshop, I’ll be trying to show some reality, must try it.
Note:
This tutorial will depend upon the Size of document and the Size & shape of text. So values may vary according to these and result may differ from this tutorial.
1. Lets start with a new empty file of size 560x400px. Press D to bring black and white colors in Color Palette. Now I’m going to make some Clouds effects, for this run the command Filter >> Render >> Clouds:
2. Create a new layer and fill it with black color and run the command, Layer >> Layer Style >> Gradient Overlay and give the following settings:
3. Hit ok and then change the blending mode of Layer from Normal to Screen through Layer Panel, this kind of effect will come:
4. Now type your desire text, I’m going to type S. M. Remember to use Bold Text, I’m using Futura font with black color. Now apply these layer styles:
After hitting Ok, your text should look like this:
5. Now select all layers, including Background and press Ctrl+E to merge all layers. Press D to bring black and white color in color palette. Then go to Filter >> Texture >> Stained Glass and apply these settings:
you will get this result:
6. Press X to bring White in Foreground and Black in Background in color palette and then go to Filter >> Sketch >> Photocopy and give these setting:
you will get this result:
7. Now go to Filter >> Texture >> Craquelure and give the following settings:
after hitting Ok, you will get this kind of result:
8. Now pick Lasso Tool , put 10 in Feather from top property bar and select some different areas like shown below: (don’t forget to hold Shift key for selecting more than one area at a time)
9. Create a new layer and fill the selection with #124477 color:
10. Now create another new layer and Press D to bring Black and White colors in Color palette, and then go to Filter >> Render >> Clouds:
11. Now go to Filter >> Sketch >> Chrome and give the following settings:
you will get this kind of result:
12. From layer panel, change the blending mode from Normal to Overlay:
13. Now pick Eraser tool with soft edges and remove this blue color which is coming over text, to make it more visible:
After giving some detailing and use some filters, Here is the final look of our Stone Text Effect Tutorial in Photoshop, hope you like it:


realistic effect
Keep up the good work. This is a very creative and cool tutorial.
Great text effect. looks pretty real 🙂 would do great on a webpage. thanks for sharing