By using this technique you can make different icons for Website. This Photoshop Tutorial will teach you some designing skills and you will make Shopping Cart Icon in Photoshop.
1. First of all take a new file of any size. I’m taking 560×400 px with 72 Resolution and RGB color mode.
2. Pick Ellipse tool ![]() and draw a circle while holding Shift key. No matter what color you have selected.
and draw a circle while holding Shift key. No matter what color you have selected.

3. Run the command Layer >> Layer Styles and give the following settings:

Don’t hit ok, click on Stroke and make the following settings:

you will get the following result.

4. Now create new layer and pick Elliptical Marquee tool ![]() and draw an ellipse like shown below and fill it with Gradient by using #1c2133 color to Transparent:
and draw an ellipse like shown below and fill it with Gradient by using #1c2133 color to Transparent:

5. While keep selecting this layer, and holding Ctrl key, click on icon of previous Circle in Layer Panel, it will select this circle, then press Ctrl+Shift+I to inverse the selection, then hit Del key to delete this part, like:

6. Press Ctrl+D to deselect the layer, and now pick Elliptical Marquee ![]() tool again and draw another Circle, but this time smaller in size from previous circle, like:
tool again and draw another Circle, but this time smaller in size from previous circle, like:

7. Now run the command Layer >> Layer Style >> Outer Glow and give the following settings:

Click on Stroke and give the following settings:

Hit ok and you will get this result:

8. Now again draw an ellipse by using Elliptical Marquee Selection tool ![]() at the bottom of this circle and pick Dodge tool
at the bottom of this circle and pick Dodge tool ![]() (with brush settings as Brush: 100 px, Range: Midtones, Exposure: 20%) and brighten the lower part of this circle like:
(with brush settings as Brush: 100 px, Range: Midtones, Exposure: 20%) and brighten the lower part of this circle like:

9. Press Ctrl+Shift+I to inverse the selection, change Dodge Tool ![]() Range from Mid tones to Highlights and continue to work:
Range from Mid tones to Highlights and continue to work:

10. Again press Ctrl+Shift+I to inverse the selection (back to its previous), pick Burn Tool (with Brush settings as, Brush: 100px, Range : Midtones, Exposure: 30%), use on the upper part of this ellipse to make like:

11. Press Ctrl+D to deselect, now we are going to add an Icon over this button, suppose we are making Shopping Cart icon, so draw any shape (or you can use Shape Tool to use any shape from Gallery):

12. Now run the command Layer >> Layer Style >> Drop Shadow and give the following settings:

you must get this result:

13. Now merge all these layers, leaving background layer, press Ctrl+E to merge all layers, then press Ctrl+T and select Distort and make the shape like:

14. Now press Ctrl+J to duplicate this layer and move the previous original layer towards the right as shown below:

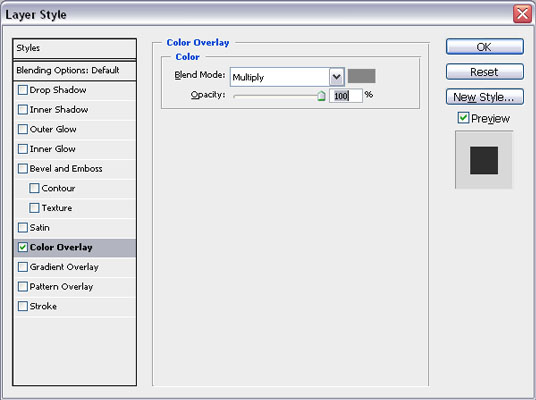
15. Now run the command Layer >> Layer Styles >> Color Overlay and give the following settings:

You must have this result:

16. We are going to add its shadow, select Background layer and add a new layer over it, pick Elliptical Marquee tool and draw an ellipse like shown below and fill it with Black color.

17. Press Ctrl+D to unselect and Run the command Filter >> Blur >> Gaussian Blur and give the following settings:

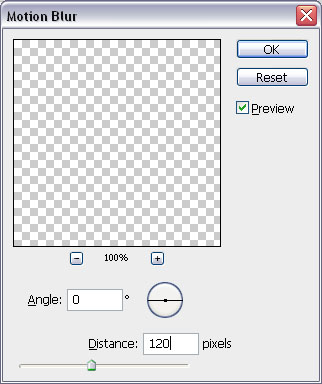
18. Now run the command Filter >> Blur >> Motion Blur and give the following settings:

Here is the final Icon you must have.


big thx for this great tutorial, it helps a lot 🙂